
Can’t you just see Janis Joplin wearing this?
I’ve been jamming on all things ‘granny square’. I stumbled upon this link and yes, it’s in CHINESE and RUSSIAN, but is very photo heavy. Could I do this? Just looking at pictures? It was doubtful, but I thought I’d give it a try. I loved the coat featured in that link, with the main body color being red, as it reminded me of those little Russian matryoshka dolls. But I thought that a more sedate forest green might work, too.
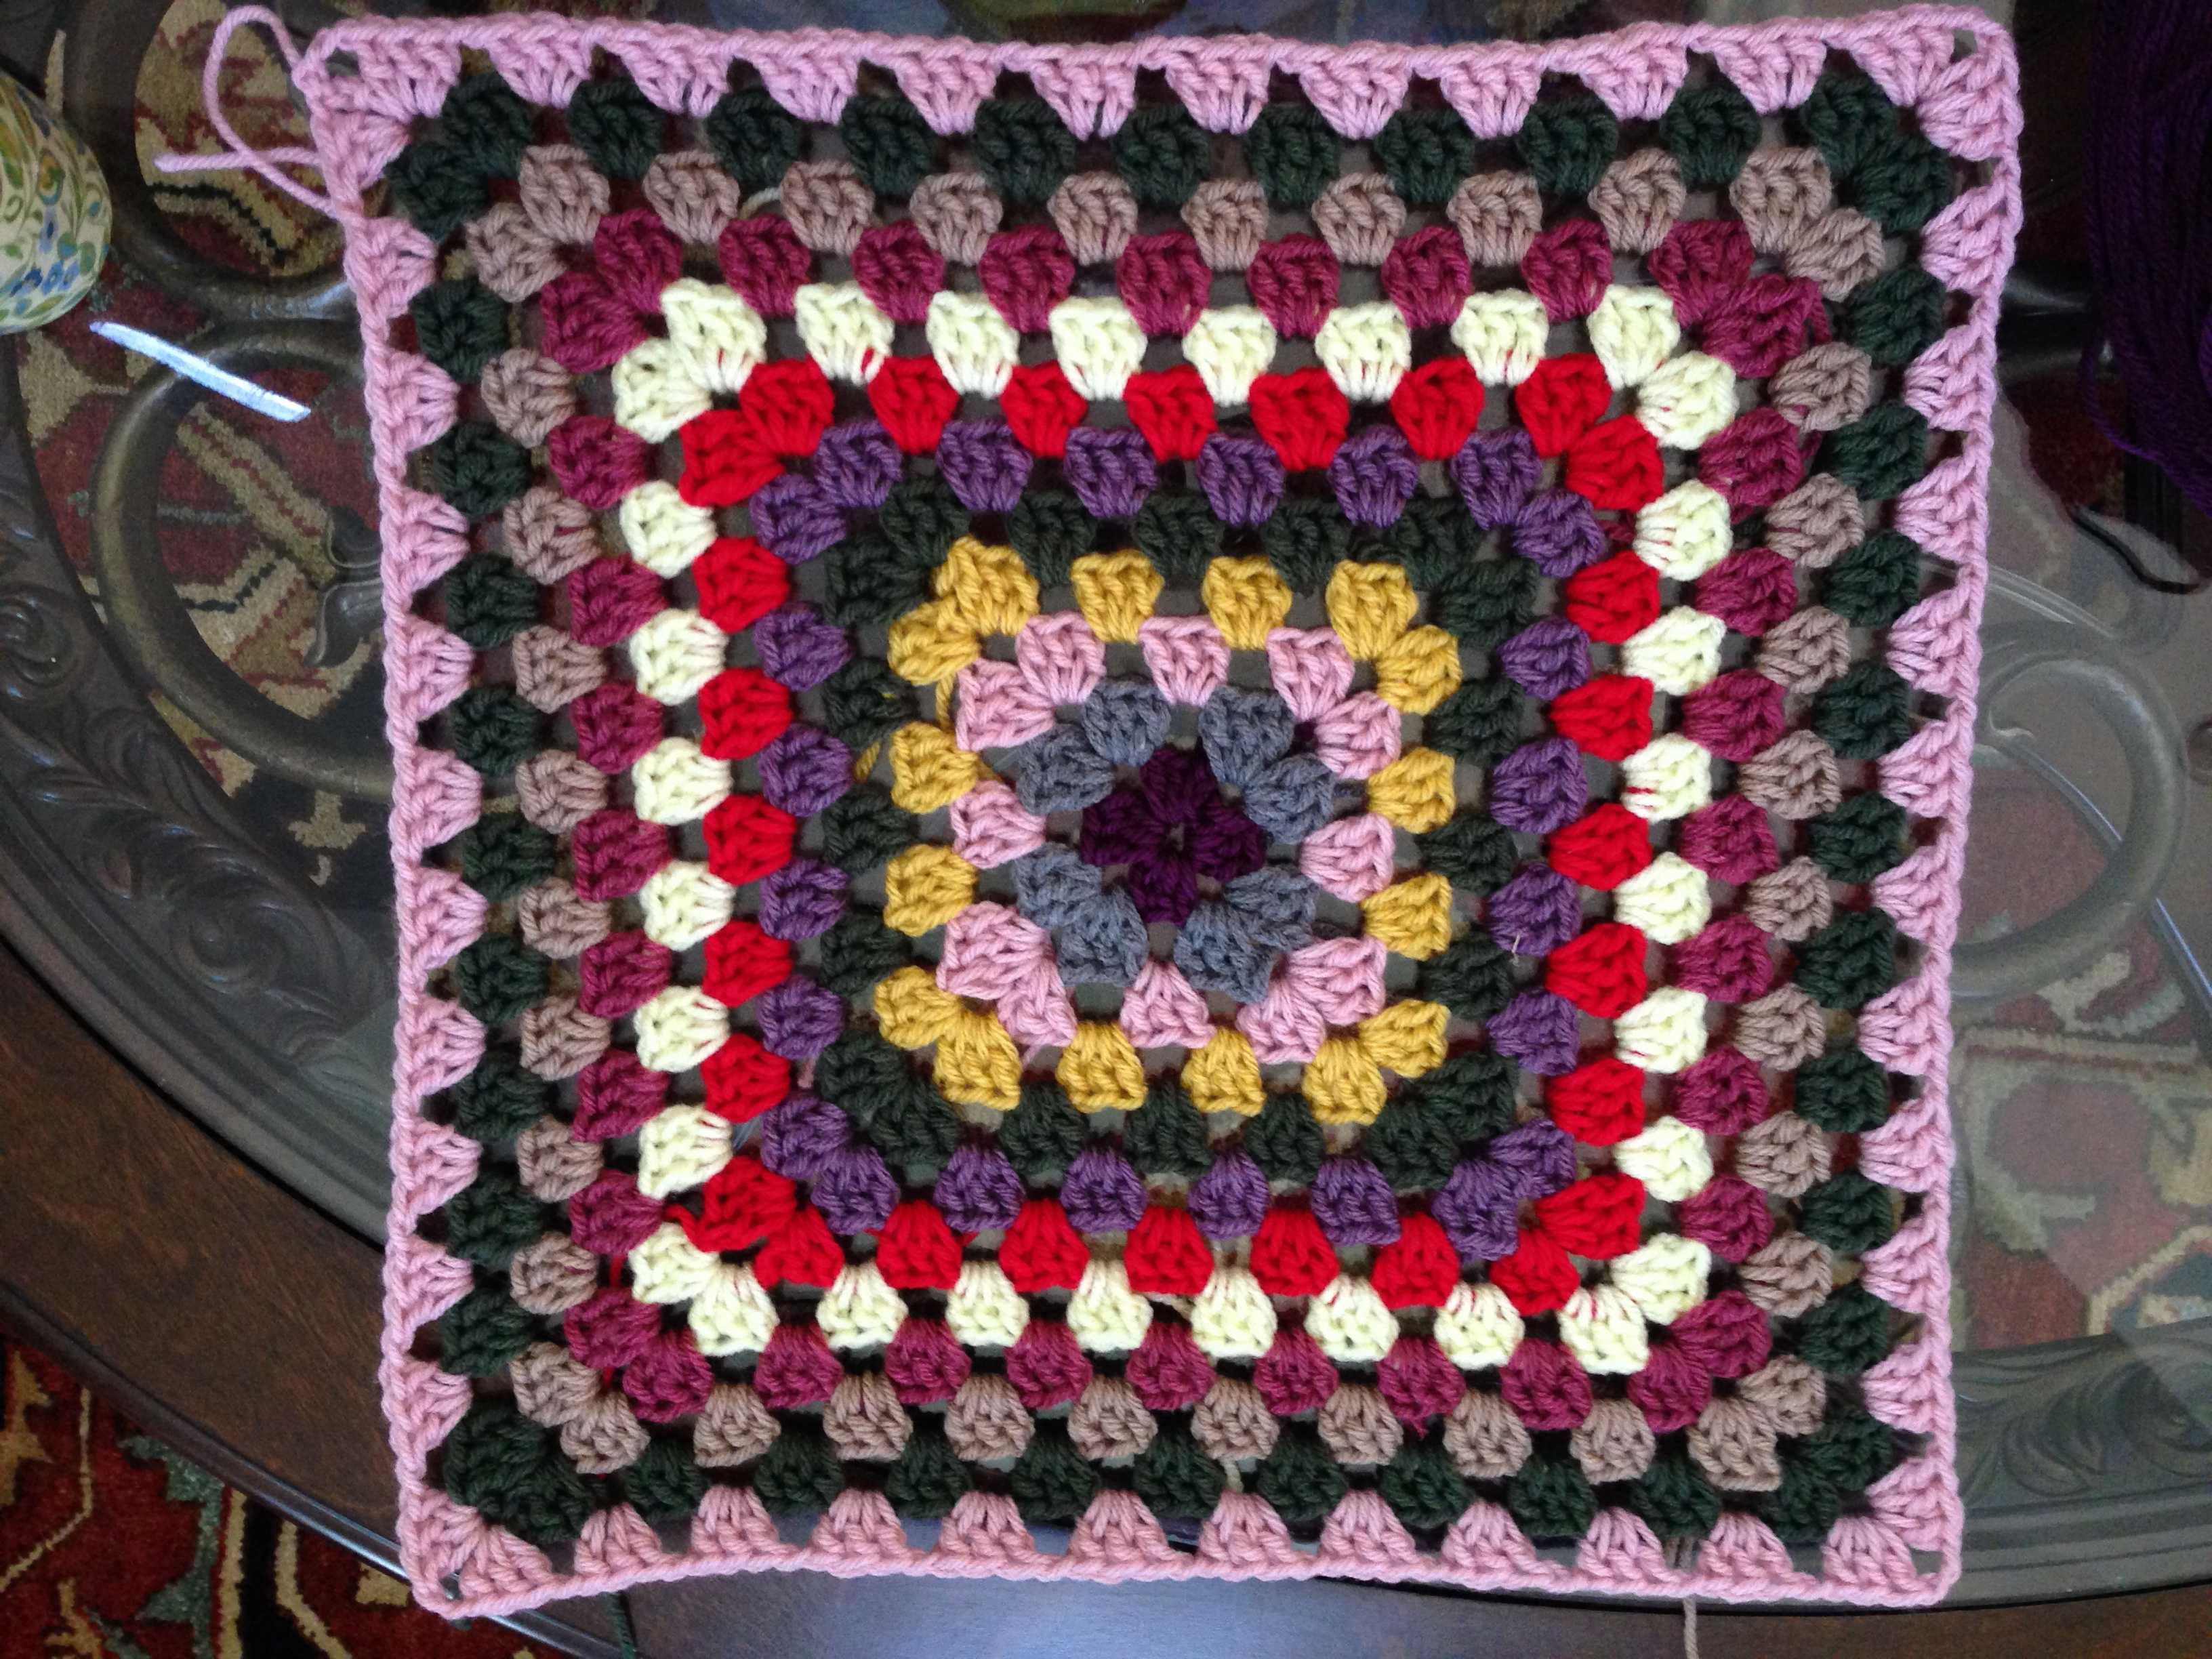
The first thing I did was to tackle the big square that made up the back.

Big granny square.
Then, I started working up some grannies to make up the body of the coat.
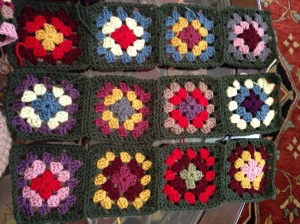
Grannies, bordered in main color – ‘forest green’
Next was the sleeve. I did a main granny square for the upper arm, then rows of granny for the lower arms. For the shoulder easement, I added a few rows on top, making them narrower as they reached where I’d hoped the shoulder seam would go.

I made two of these – one for each sleeve.
And after sewing it all together like some kind of yarnish Frankenstein monster, and then crocheting several rows along the bottom, and then from front edge, around the neckline to the other front edge, this is what I ended up with!

I have literally hundreds of tails of loose yarn to weave in, but it’s done, I did it, and I couldn’t be more pleased. Somehow, I thought that the forest green would make this a little less ‘out there’. Hubby, I promise I won’t wear it when I’m out in public with you!
EDITED TO ADD A HOW-TO PATTERN
Crochet a granny square that fits comfortably across your back, going from shoulder to shoulder.
Crochet 3 granny squares that will fit side by side on the bottom of the ‘back square’. So, if your ‘back square’ is 18”, then make your three squares that are slightly smaller than 6” to account for a little space to sew them together.
Crochet a granny square big enough to fit comfortably around your upper arm, then add rows back and forth on the bottom of this square to lengthen it into a rectangle, to your desired sleeve length, generally to the top of your wrist. Then, on the top of the sleeve, where the shoulder is, make a few more rows, so that you have a flattened triangle shape, and crochet all around the sleeve. As you can see in the photo, I used the dark green to outline the whole sleeve. There, you’ve got a sleeve! Make two of them.
Make two granny squares the same size as the ones you made to go along the bottom of the ‘back square’, in this example, 6”. These will be attached to the top of the ‘back square’ and will lie across your shoulders, down onto your upper chest, leaving a space between for your neck.
Pin top of sleeve, where the flattened triangle is, to the shoulder seam created by attaching the ‘back square’ to the shoulder/upper chest square. Sew sleeve in place. Sew bottom sleeve seam.
So now, you’ve got the main customization done!! All you need to do is to crochet additional squares to add them to lengthen the back, and to lengthen the front, adding squares as needed to join the back portion to the front. You will want to have a good bit of space between the front opening of the jacket, as this space will be filled in once you single crochet from the bottom hem, up around the neckline, down to the other bottom hem, and back, several times. This creates nice shaping around the neckline and closes in the jacket some.


Love your jacket.
Thanks so much! It seemed daunting at first, working without a pattern. But breaking it down into smaller bits made it not so tough after all.
WOW I love it, well done, what a fantastic project, my to do list has just got longer LOL
Believe it or not, this actually worked up really quickly! I think if it took a long time, I would’ve become disheartened. I was nearly finished by the time I started second-guessing myself for giving this a whirl.
But did it fit? I would love to see a picture of it on you? So awesome! WANT!
Yes, it fit like a glove. Especially around the shoulders. I have to say, I was really surprised at how well it came out.
Thank you for this inspirational story! Started my own project based on your coat. It is really not that complicated after you have salami-sliced this. Thank you again!
Wow that’s lovely. Which yarn did you use?
Thanks, Nic! I used regular old worsted. The brand is called Loops & Threads.
LOVE IT!!!
just so you know,if you view the link on google chrome it will translate the page for you 😀 also i am SO making one of these,my husband already hates me for it bwahaha
Thanks, Stephanie! Would love to see a pic of your finished garment!
Love it!! Pic of you wearing it would be great to see….please 🙂
Unfortunately, I donated the coat along with a bunch of other things. I no longer have it!
beautiful!! what size hook did you use?
Hello! I used a 6 mm hook, or size J.
How big are those squares you made?
The main squares are 4 rounds of double crochet using worsted weight yarn.
Hi, could you tell me in more detail how you made the sleeves?
Thanks
It really helps to have a sewing background – if you’ve ever made a dress or some kind of blouse, that’s basically how the sleeve comes together. The main square of the sleeve has to be big enough to comfortably wrap around your upper arm, so that it makes a ‘tube’ (or sleeve!) when the two sides are eventually sewn together. The rows that fill in the lower arm area, just make as many as you need to for the length of your arm. The part above the main square – that’s where things got tricky. I crocheted gradually narrower rows on top of the main square to allow for the shoulder easement. After I did a few, I put on the (sleeveless) coat and placed the square on my arm to see how things were coming together. It was by doing this, and a little trial and error, that I was able to figure out how many rows for the shoulder I needed, and how wide they needed to be. Then, I attached the sleeve at the top shoulder, sewed all around the arm hole, and then down the underside of the sleeve. The good part is that you only have to go through the constant trying-on-and-looking-in-the-mirror foolishness once, because you make the other sleeve exactly the same as the first. Hope that helps!
May I ask what size this fits when done?
Hmm, I would say about a size 12, the way I made it here.
I loved it soo much
Can U please tell me what’s the company name of the string and what’s the number of the colors that you used in this beautiful coat ?
Hello, thanks so much for the compliment! The yarn that I used was Impeccable Loops & Threads worsted from Michael’s. I have no idea what the colors are – they were just a bunch that I had pulled from my substantial yarn stash! The main color is called ‘Deep Forest’ – that’s the green that makes up the bulk of the coat. If you want to give this a whirl, just find colors that you love. All the best! Post a pic if you make it!
Could u tell me What’s the number or the name of the colors that you used?
Does anyone else like to use a plain color for the sleeve on a highly patterned garment. Makes you look thinner! Green sleeves with the same color cuff as the front edging would tame it down jevechapinust enough for me.
Did you happen to write a pattern?
No, I didn’t. I made it up as I went along.
Great job ! How big is the square for the back en thé sleves en the other squares please ? Thank you go share !
Unfortunately, I have no idea. I don’t have a coat anymore. I’ve basically just kept crocheting rounds of the Square until it wrapped around my arm comfortably.
This is such a great project. You’ve almost given me the courage to try it!. Thanks for the great pictures and for answering everyone’s questions. Also, next time you decide to “donate” a project…call me.
It really is quite easy. Just tackle one part at a time. And if you know how to ‘join as you go’, you’re already so far ahead of the game. I didn’t figure that out until long after this coat was done. 😁
May I ask how many small squares are needed…? Every free moment I make one, but I would like to know the global amount. Thanks!
I’m so sorry, but really, I just don’t know! I donated this coat a while ago. Glancing at the photos, it looks like the bottom has about 28 squares, and it was rather long. But honestly, the amount will depend on the size you’re making. I would periodically just drape it over various body parts to see if more squares/rows/rip-outs were needed. Decide on how many squares in a horizontal row it will take to wrap around the widest part of your hips and close over in the front, and how long you want the coat to actually be. It’s so very subjective! Post a pic here when you finish, I’m dying to see it!!
I appsolutely love it and am going to.make a grey, pale pink, hot pink, purple.and.mauve.one!!!!!
Thank you! And if you make one, please, please post pics here! I’d love to see it.
Think you need 16 little square for back part, and 12 little square for the right front, 12 little square for the left front. You can count them.
Someone PLEEEEEZE do a TUTORIAL! I’m a Newby but can follow a tutorial!!!
I love it. I have looked different granny jackets over the years.Haven’t been brave enough to try without a pattern.
Would someone please create and write up a pattern… You would make me one happy lady and earn some good Karma!. I bet you would make a lot of old hippy ladies like me happy! I need a pattern.. can’t wing it…too frustrating…pleasssssssssse and thank you.
Thank you so much for sharing your work and the process, I have admired the Coat on the Internet like this. You have given me the courage to try and make it myself. You did an amazing job with this especially as you changed the colour theme.
Thank you for this post, the link, AND your thoughtful and thorough answers. Sharing your experience is almost as good as a pattern. I’ve loved this coat for years and you’ve given me the confidence and the tools to try it.e
I absolutely hope that you give it a whirl, and post a photo of it here!
Has anyone started working on this? I love it if we could work on it as a group some how and come up with a size of square – it looks to me like you used a grey for the last round of each square and then a grey for connecting but hard to tell colors on the computer
It was actually a hunter green. And if you count the rounds, you can get an idea of how big the squares are. Unfortunately I donated it years ago, so I no longer have it to reference.
I love it and what better time than this awful virus shutdown to try and make it, can believe you made your in 2014 and here we are 2020 still making it, not sure where you are, I’m in uk, so stay home keep well😊
Thank you
Hola!! Te escribo desde Argentina, estoy intentando hacer el tapado, muchas gracias por tu explicación!! Se entiende perfecto!! Espero poder terminarlo pronto 😊 Saludos!!Gisela
Have you ever or would you write a pattern in English for this? I’d love to be able to make this but there is not enough information in the picture for me. Thank you.
Love your version of this sweater. After I finished my current project I want to tackle this. Do you have a pattern or did you just eyeball it?
Hello Linda, no pattern at all, just crocheted squares big or small enough for the particular area of the sweater!
Like a few of the other recent commenters, I’m going to be taking a stab at this sweater here in Quarantine 2020. I’ve started purchasing yarn and doing some initial planning and I thought I would share it here in case anyone else could use it.
Using all the info here (Thank you, The Lady of the House, I’m excited to try this.), I’ve purchased “Loops & Threads® Impeccable™ Yarn, Solid” from Michaels. Regular price $3.49, but can be caught on sale for $2.99 for a 4.5 oz. / 127.5 g, 285 yd. / 260 m, 100% acrylic skein. Currently, they have 60 colors for sale.
In the jacket pictured here on this page, I’ve identified 12 colors
I feel confident about these particular colors:
– bright white — L&T color White
– baby pink — L&T color Soft Rose
– bright red — L&T color Cherry
– dark burgundy — L&T color Burgandy
– dark purple — L&T color Amethyst
– deep green — L&T color Deep Forest
I’m unsure about these but here are my personal choices:
– mid magenta — L&T color Magenta — possibly too bright, but best match
– soft yellow — I’m trading this color for an orange L&T color Pumpkin, partially because the L&T color Butterscotch seems a bit too light, and the darker L&T color Gold is too dark and mustardy to match the pictures. There are a few other yellows, but they are too bright for me
– bright blue — L&T color Clear Blue — seems a bit brighter, but best match
– mid purple — L&T color Lavender — a bit too muted and lighter, but best match
– mid gray (? might be a dove-ish light blue ?) — L&T color True Gray as best match
– light gray (? might be a tannish warm gray ?) — L&T color Pale Gray as best match
In a comment, The Lady of the House mentioned she used a 6 mm hook, or size J hook. I did do a little test granny square with a size J, but I was afraid that it might not be stiff enough to hold up the rest of the sweater. Might be my amateur crocheting or the fact that SOME of the colors suggest a size 5mm or US H/8 hook…. (??? lol, they do all say they’re Medium 4 size yarns) and I’m going to stick with that.
I’m sorry for writing a novel and if this seems too spammy feel free to not approve the comment. 🙂 I don’t currently have a Facebook or an Instagram in use to link to, but if anyone else is playing along in 2020 giving it a shot get in touch!
Thanks again The Lady Of The House!
– S
Hello, thank you for your interest in this zany project!! So you know, there is no gray in this coat. There’s a sage green, and a mauve that is probably reading as lighter gray and darker gray, respectively. I really wish that I hadn’t put this coat in the bag for Goodwill! Would’ve come in handy as a pattern to give you all some better guidance. Thanks again for your comment, and I do hope you post some photos of your coat!
Oh you’re right! About all of it, but specifically about the sage green I failed to mention in my first comment. I did note that color in my preparation mostly due to the square below the center back that has a center of sage, then burgundy, then red.
I purchased:
sage green —- L&T color Fern
So funny, I keep staring at your photos and don’t see mauve, but I’m positive it’s just photo/monitor magic! So my version will have 2 grays.
I added two extra rows to my back piece, which makes it 14.5” across without stretching, shooting for a loose US 14, ideally. I thought I might have to add rows to the small blocks, but they came out 4 3/4” and I think they look close. Here’s a quick pic of my rough progress and some of the color differences. I’m intimidated by the sewing together process, but that’s an issue for another day. https://imgur.com/a/igNj4eb
Honestly whoever lives near your donation center are lucky folks, maybe one of us doing recreations will run into your version one day. 🙂 Besides, without an exact pattern there’s gonna be a real opportunity for beginners learning on my end, haha
Can you please tell us how many skeins of each color you used?
Hi there! As there are so many colors used in this coat, I used less than one skein of each color.
So that is over 3000yards of yarn then, guess I will have to get a big stash! Thanks for this, I had no clue as to how much I needed.
There are lots of colors used in this sweater, but you won’t be using the entire skeins.
Where can I get a printable pattern for this? I really love this jacket and cant find the pattern. Please help!!!
Hi Karen, sorry, there’s no printable pattern for this. I made it up as I went along. Read through the comments, there is some good guidance I provided to help. Best of luck to you!!
Thank you so much for adding the pattern! I will have a try at this. If I ever finish it, I’ll definitely post a picture.
Cheers!
That’s great, would really love to see your photos!!
This is gorgeous and although, like others say, it was daunting to try without a pattern, it’s not as hard as you first think. However I am a little stuck with the under arm. Wondering if a more triangular shape would work as a square won’t fit. Is that what you did with the green? Many Thanks! Eve
I don’t specifically recall the underarm, but if that is what works for you to get the more tailored fit, then I say yes, full steam ahead!
I don`t know how to upload a photo of the finished cardigan here, so I’ll just give you a link to my instagram post: https://www.instagram.com/p/CKtI7pNrz6u/
I chose 6 colors. Of the main color I used about 700m, a little under 200m of the brown, red and purple and just over 100m of the light blue/grey and beige. The arms were quite a challenge for me but other than that this was actually quite a breeze. I loved making it! Thank you for explaining everything 😀 Cheers, Lene
WOW, great job! Love how you finished the sleeves, nice cuff detail. Thank you so much for sharing! xo
This looks great. I really must try it.
Just finished mine, loved doing something different, I think the hardest part was working out what sequence to do the granny squares in. I didn’t use the pattern but worked it out by just looking at it
Don’t know if this is still being monitored but if it is how did you join the squares? Because of the dark color difficult to see. Did you sew or do a flat slip or some other stich?